
Post processing
In this section I want share my experience about processing the photos - focusing on the stacking itself.
LR: managing the photos
A major reason for me to use LR is the library function, which in fact is a photo database.
I have not found any better database for photos. In combination with an Excire Search plugin I can easily sort, archive and find my photos.
Especially sorting photos is essential for focus stacking, which must be thought about. We easily can get a huge number of very similarly looking pictures, and without a good sorting tool or mechanism we easily can get lost.
Import and remove rubbish

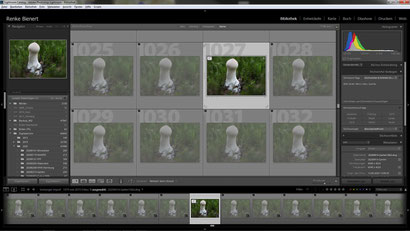
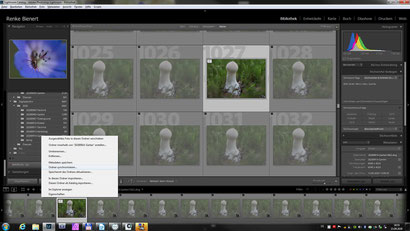
After the import in LR, I check the photos in the library.
In the first step I search for the first sharp photo of a stack. Then I select all previous (non sharp) photos of that stack and mark them with <X>. They will be removed afterwards.

Then I quickly check the stack: that shows me whether the stack might be usable or not. And I get to the last usable (sharp) photo.
I select all the usable photos and "stack" them.
So the whole stack is marked, while the first picture is visible.
Create stack
Afterwards I group all photos of that stack in one stack. The remaining non sharp photos after that the last sharp one (if any) I mark and remove (<X>).
They will be deleted later, too.
So all photos, belonging to one focus stack are grouped nicely in one stack.
Edit photos before stacking
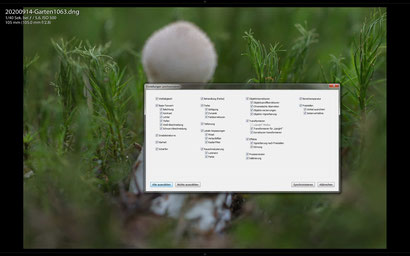
I select all photos from one stack and edit them by editing one and then "synchronizing" all settings. With that I can be sure that all photos from one stack are edited the same way.
Basically I use 3 editing steps before stacking:
Step 1: Reduce highlights and increase the black value

I reduce the highlights massively, since the stacking increases the contrast and exceeding highlights can cause problems during the stacking.
For the dark parts of the photo, I do similarly and increase the black value.
With these two changes the photo gets "weak", i.e. shows very low contrast, but without increasing the noise level in dark part of the picture. The 16 bit of the used TIF format allows to re-correct these changes after the stacking without loosing information.
In principle we could increase the shadows instead, but that increase the noise level without showing any major advantage. So the the increase of the black value is the better option.
Step 2: Sharpen

I sharpen the photo quite a lot, i.e. I increase the sharpening including the mask level.
It depends a bit on the used camera, lens and ISO level, how much is "good". However, the photo can show quite a bit of sharpening effect.
Step 3: Lens correction and synchronize settings
In the last step I normally would recommend a lens correction (if not already done automatically, and if the lens is known by LR).
The minimum should be a correction of the chromatic aberration (CA), even if the lens is unknown by LR, or the automatic correction is wrong due to the use of an additional "filter lens".
Then I synchronize the settings within the whole stack of photos. With this I am sure that all photos use the same settings & corrections.
Export to Zerene

Afterwards all photos of the stack are exported to Zerene.
Stacking
The Export of the photos from LR automatically opens Zerene.
I will cover the main settings of Zerene and some possibly useful changes later. Basically we can start with the default settings.
Two Methods: use boths!

Zerene offers two methods of stacking, and I use always both.
The best results can be achieved with the later combination of both method results, which can be done nicely within Zerene.
So I normally always start the <Align & Stack All (Both)>.
First method PMAX
The first method PMAX is executed without any interruption. This method typically shows the best details in those parts, where many details are. However, PMAX increases the contrast and the noise level, especially in those part of the photo, which are without many details.
So PMAX typically gives fine details, but ruins the plain areas. Also strong highlights can cause problems with PMAX.
Second method DMAP
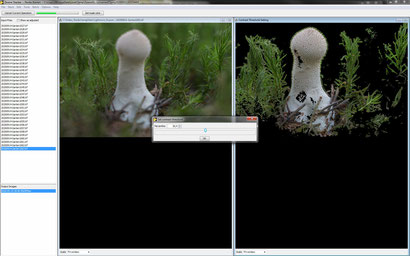
The second method DMAP requires an input from us: after a first calculation, which aligns and analyses the photos, we see a "preview" in combination with a slider.
This slider allows to adjust a threshold from 0 to 100%. This threshold defines, which parts will be used for the stacking (visible) and which parts will be "ignored" (black).
For the "ignored" parts, the second method kind of creates a smoothed area.
DMAP threshold
I recommend to move the slider once from the left most position (all visible) to the right most position (all black): with this we see and "feel", what happens and how the threshold makes Zerene interprets the photo.
We can typically see, which part of the photo are interpreted correctly, and which parts cause artifacts.
In the second method DMAP an obvious "correct" threshold typically leads to a wrong interpretation and too many artifacts. Especially along sharp edges in many cases there will be "halos" in the plain areas.
So to me it seems much better to mask out too many sharp details (black) rather than to create too many artifacts in plain areas: put the slider rather a bit more to the right.
To be clear: I adjust the slider in such a way that less is visible than obviously required.
Better to have less areas visible rather than too many!
Even though it sounds a bit ridiculous, but the strength of DMAP is not the correct stacking of details, but in the creation of the smooth areas outside the details.
And sometimes a good threshold is above 90%, which almost looks like there is nothing remaining to stack.

The same picture like above with the DMAP threshold adjustment, but here the threshold is set much higher, almost too high - as it seems.
However, with this threshold the best result was achieved.
Comparison of two thresholds
Here a direct comparison demonstrates the effect of two different threshold settings in DMAP.
It can be clearly seen that a lower threshold - even though it seemed to be a correct setting - , leads to weird artifacts. The higher threshold, which seems to be too high, shows better areas and less halos.
Even if some good details might be missing in those areas with many sharp details: that does not matter at all, since those details are normally better available in the PMAX method anyway.
Exception: errors due to moving objects (e.g. due to wind) can cause errors more easily in PMAX. In such cases it might be a good option to stack DMAP with different thresholds - or to use the "slabbing".
Missing details in sharp areas can be edited later on and copied from the PMAX result, so my recommendation is:
Keep the DMAP threshold rather too high than too low.


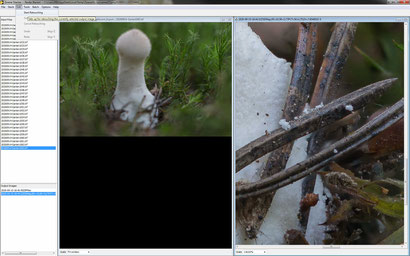
At the end of the complete stacking execution, Zerene has created two results with both methods. The two results are shown in the output window on the bottom left hand side. Clicking on one of them opens the picture in the right window.
In some rare cases one of the two results is already good enough and can be taken. However, normally a simple edit ("retouching"), which combines the strength of each method, is recommended.
Retouching
The retouching can be started with either result, but I recommend to start with the result of the second method DMAP.
A zoom easily demonstrates the weakness of DMAP: especially at the edges of sharp details we can see artifacts.
"Start Retouching"
Starting the "retouching" shows a yellow circle, which can be decrease or increased with the scroll wheel of the mouse.
Pressing the space bar allows to use the same scroll bar to zoom in or out, or shift the visible area with the mouse.
Clicking the left mouse button simply copies content from the left window into the right window.
That works intuitively and easy.
The only real important thing: we need a good source to copy from (on the left hand side). To get one, we simply select one photo from the input or output.
As mentioned above, normally I start retouching the DMAP result, and simply select the PMAX result as a source. Retouching from left window to the right window works easily.
Any photo from the list can be chosen as source and is always aligned. So even correcting with the DMAP result as source into the same DMAP as target works.
This retouching is a very powerful tool.
Weakness of DMAP

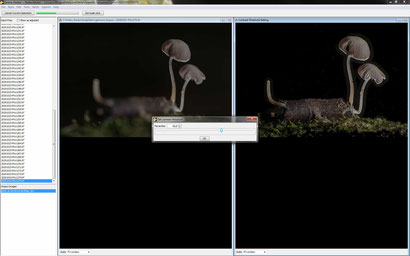
The result of PMAX as a source is shown on the left hand side, the DMAP as a target on the right hand side. So far nothing has been "retouched" yet.
The 150% zoom clearly shows the weakness of DMAP inside the yellow circle. The crossing of sharp details are much better done in PMAX, so we simply copy the good PMAX into the weak DMAP here.
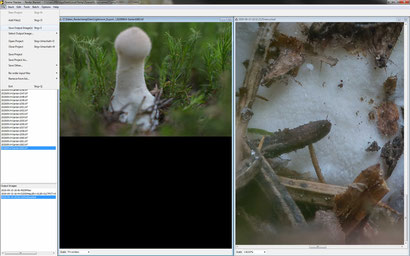
Weakness of PMAX

In the same retouching, in another area, we see the weakness of the PMAX (and why it makes sense to combine both methods to eliminate the weaknesses).
In the green background area the PMAX shows "halos" at the edges of the mushroom and an overall increased noise level.
So in this part the result of DMAP is better and should not be retouched here...
Do not worry about wrong retouching!
There is no reason to worry about a wrong retouching, because everything is non-destructive.
At any time we can abort, go steps back or save a result and restart or continue.
James Joyce:
„A man of genius makes no mistakes. His errors are volitional and are the portals of discovery.“
Saved (intermediate) results can be used for another retouching, either as a target or source. So we can even generate multiple results and make our choice at the end - and withdraw all other intermediate results.
Save result
When all the retouching is done, and the final result is saved with „Commit Retouching“, the final result file is shown in the bottom left output window.
Now it can simply be stored back, using the „File“ and „Save Output Image(s)“ (or via <CTRL> + <S>).
Zerene offers a browser window, where I could chose the place to store the final picture, and can modify the name of the file.
However, I recommend not to change the folder, but simply save the file into the given folder, at least, if I work with LR. Because in this case Zerene saves the file automatically into the same folder, where all the original RAW files are located (i.e. my LR archive folder). This makes it easy to import back the stacking result into LR.
Names of stacking files
We can change name as we like. And in LR the file name hardly matters.
However, I am used to use the date and time in the file name, which Zerene does automatically.
On top of that I prefer to add "_" + the number of single photos, which were used to create the stack. With this I can later export the final result from LR and see from the file name, how many single shots have been taken to create the stack.
Tip
In the Zerene „Preferences“ some presets can be defined for an automatic file name generation.
The preset
{datetime} {method}_{numinp}
creates a name like "2020-09-19-10.22.07 retouched_29.tif", which indicates a stack from 29 single shots, which was created on 2020-09.19 at 10:22 with retouching.
Close Zerene

Afterwards I close Zerene and discard all temporary files, i.e. Zerene deletes the complete project from my PC's hard drive including all exported single TIF files and results.
Only the previously stored final result is not being deleted.
The only remaining file is the stacked photo as TIF, which had been saved in the same folder, where all the single RAW files are stored. For the final editing I need to re-import this stacked result into LR.
Editing after stacking
My final editing after the stack is finished happens in LR.
Synchronize folder
For the final editing I import the stacking result into LR. The easiest way is to synchronize the folder: right mouse click on the related folder offers the menu option to synchronize the folder.

LR recognizesa new photo in the folder and imports it. So the result is automatically at the right place in my folder together with the original single shots.
Tip
LR allows to sort the photos: I use the option of sorting according to "Capture time". This sorts the freshly imported file right next to the pile of original single shots.
Post processing
Of course the post processing depends on the photo itself, but basically I try to recover the adjustments from the beginning: Whites and blacks, highlights and shadows.
Another main part might be the removal of dust sensor spots, even though due to the stacking process itself (in DMAP) and the fact that many stacks are made with relatively wide open aperture, there might much less of such spots visible than with a "normal" macro photo, which had been taken with closed aperture.
Another sharpening should not be done - or at least it should be done very carefully! Keep in mind that the original input files had been sharpened already before the stacking.
